Showing posts with label Weekend Warriors. Show all posts

Monday, April 25, 2011

The last three months...

I have been just a horrible blogger.  Nothing of substance has been posted for months!  So, here is an update of some of the things Teddy and I have been up to since January.

We hosted a super bowl party with the family, even though we had to bear watching the Packers win.

We're all focused on watching the game

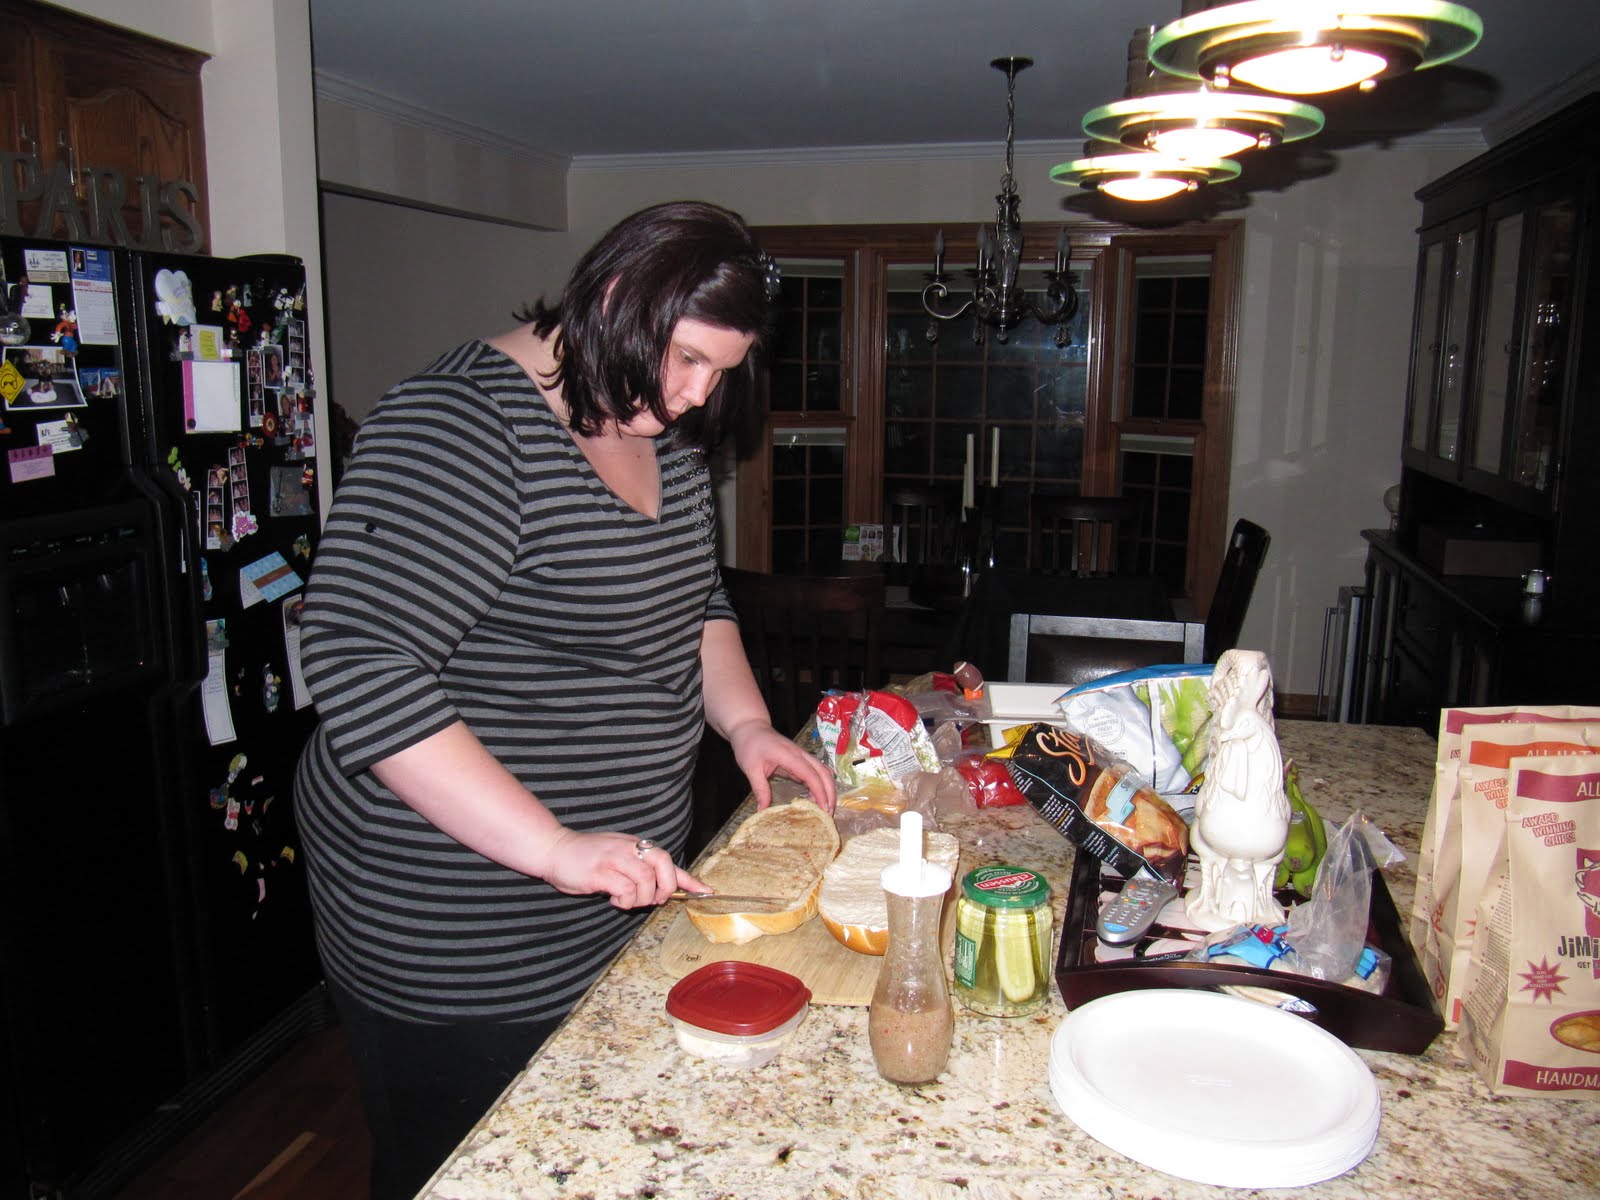
Sara made a delicious sandwich for all

Then late February we celebrated my nephew, Carson's 1st and golden birthday.  He was one on  March 1st.

Doesn't he look good in that hat

His sister was pretty excited to celebrate too

Later in March, we celebrated Erica's birthday

She's looking like she's ready to party.

Since I was busy working every Saturday, Teddy decided that he wanted to do some work on our guest bedroom.  One of the walls was covered in cork board.  He worked hard to remove it to reveal this mess.

Yes, that is one hideously green wall covered in stinky glue that was holding the cork on

He worked for at least 2 weekends in a row scraping all that glue off, and then spackling up the wall that was damaged.  Even Fozzie stopped by to check out his hard work.

Then he gave it a nice coat of primer, which surprisingly covered up that awful color. 

After finishing that project, Teddy got the bug to replace the doors and trim in the room, similar to what we did to the bathroom between Christmas and New Years. 

Here are the closet doors nearly done, they just need the trim casing around them.

He also did all the baseboard and the main entrance to the bedroom.  What are we going to use this room for now that it is nearly done?  More to come on that.

Then in April, I went to Beijing for a business trip.  I got there a couple days early so I was able to check out some of the sites before the meetings started.

We went to see the Forbidden City

Many of the buildings in the Forbidden City were repainted for the Olympics, this was one of them.  The colors were so vibrant

The next day we headed out to see the Great Wall

The wall was amazing, truly an engineering marvel that it was able to be built in the first place, let alone still be standing after all these years

We were able to see a small section of the wall, the whole wall is over 4,000 miles long, so it would be pretty impossible to see it all.

On our last siteseeing day we went for a long walk through Beijing to see the Temple of Heaven.  We got side tracked going through this park that had some beautiful cherry blossom trees blooming.


We finally made it to the Temple, which was really beautiful and worth the long trek there

 Beijing was an amazing trip.  I wish I had taken more pictures, but unfortunately the camera died in the middle of the trip. 

So far 2011 has had a great start!  I still have some more news to share, but I'm going to save that for another blog.  Hopefully, I'll be blogging about that soon.


Sunday, January 2, 2011

The Guest Bathroom Remodel: Day 4

We are in the home stretch.  All the things we thought would be tough (light, doors, trim cuts) are all behind us (or so we thought), and it is all about the finishing.  We started the morning finishing out hanging the trim.  Teddy worked at drilling pilot holes and then nailing the last set of nails needed on the trim.

He's hammering away

And then drilling more holes for the next door

I took a swing at hammering for a while, and before we knew it, we were done.  Teddy set all the nails.

And I got to work on the putty.  This was our big moment of celebration.  The doors were hung, the trim was up and we figured another hour and everything would be done.  Everything else left was easy.  Changing out the toilet seat, putting on a new faucet, hanging towel bars, etc.  All sounds pretty simple, right?  Well, it was, except for one part.

Nope, not this part, this was easy.  Teddy got to work replacing the toilet seat

Nope, this was easy too.  I installed our new toilet paper holder

Oooh shiny

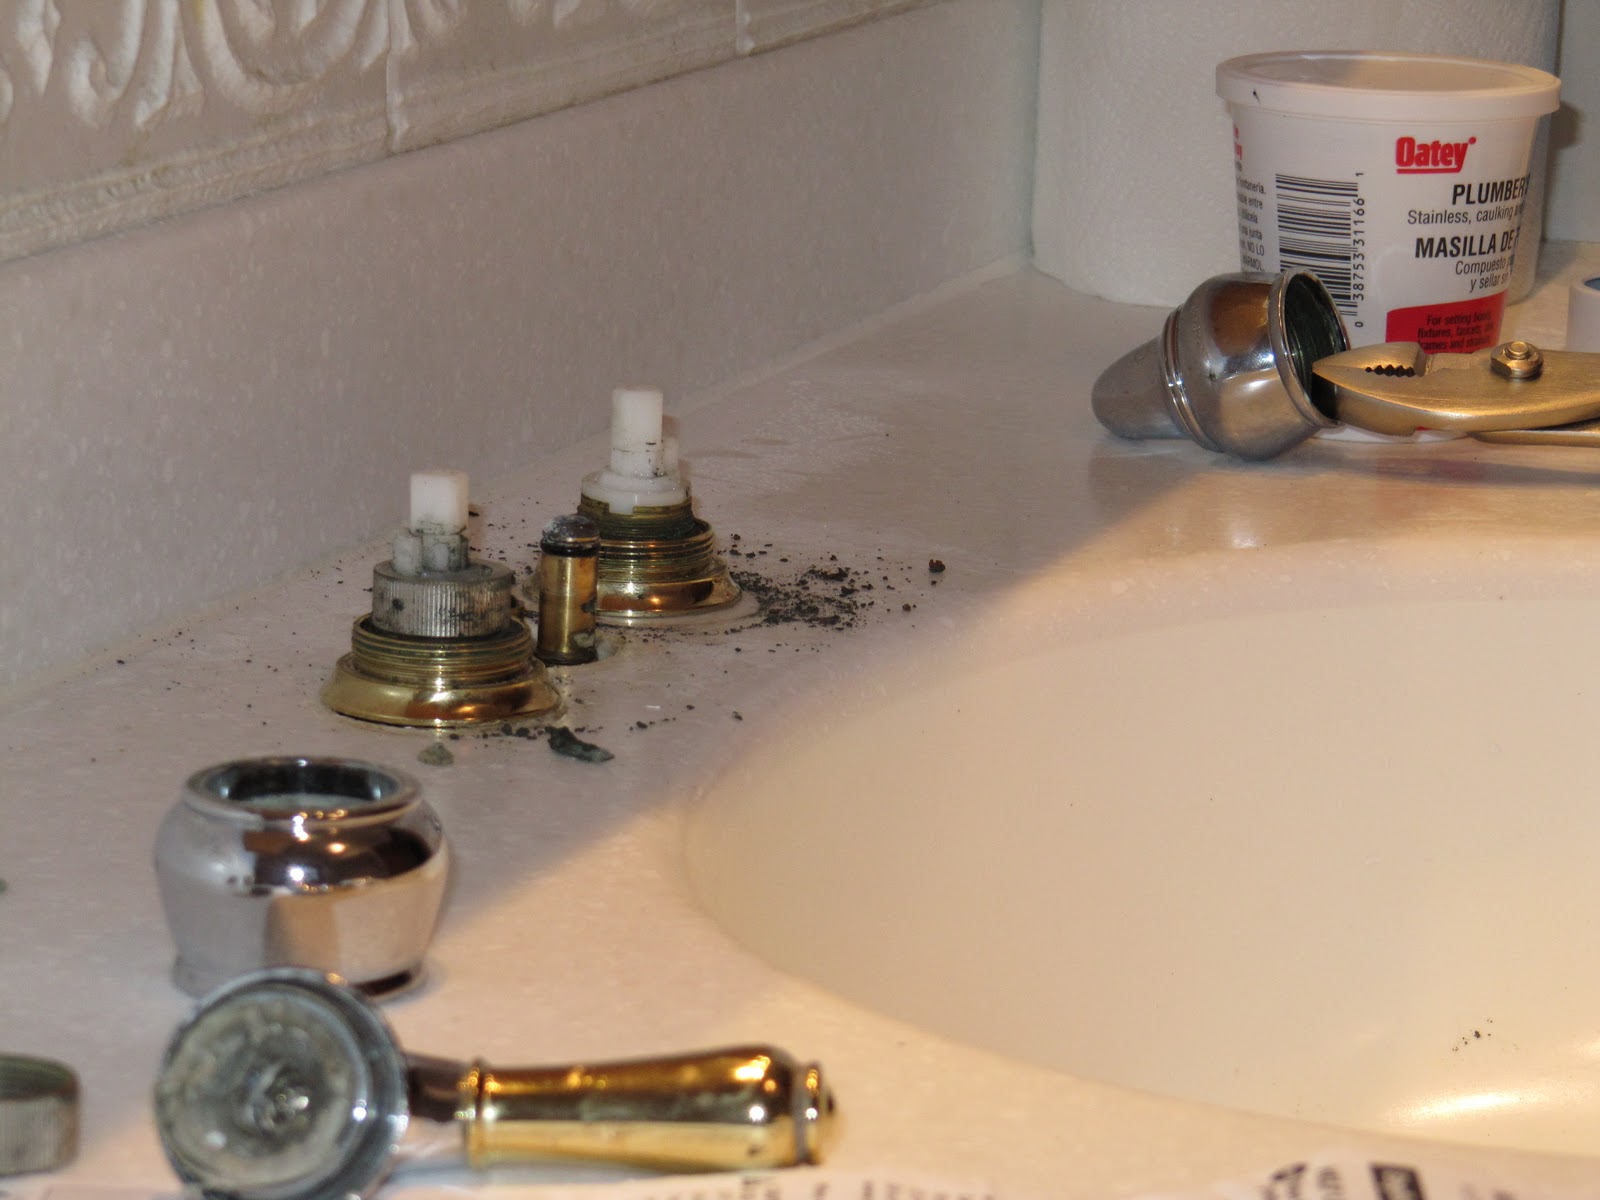
And here it is.  The biggest pain in the @#$ of the whole remodel.  Now this may be a slight exaggeration, but it was what we believed to be our last day, it was New Years Eve, and all we wanted was to no longer be in this bathroom.  Unfortunately, Teddy spent a lot of time as you see him in this picture.  Now the first issue (notice, I say first) was just getting the old faucet uninstalled.  This thing was put in there to last for life.  We thought it would be simple, we had put these things in before at my old condo, so why would this be harder.  Well, if you can't get the old one off, it's kind of hard to put a new one on.  We tried loosening the nuts, unscrewing the fixtures from the top, hammering at things, in the end, we end up breaking everything apart piece by piece.  I think it took about 2 hours to finally pry the pretty finishes off.  And this is what we had.

Notice the faucet is in pieces, but the plumbing lines are still securely held in place by those gold rings at the base of the hot and cold valves.  Those gold rings were our problem.  What they were hiding underneath was a locking ring that wasn't letting anything through.  And underneath the sink, they had sottered on a cross bar to prevent anything from moving, so we couldn't get it out from that way.  So, using my dad's mantra of "be smarter than the material your working with" we came up with the perfect solution.  A lot of swearing, and then some tin snips to slowly snip away at the gold rings until we could pry that d#$@ locking ring out.  This took about another hour if not longer.  OK, so maybe we weren't smarter than the material, but we finally got the darn thing removed. 

We then made the mistake of doing another victory dance.  (When will we ever learn - you don't celebrate until the game is over!!)

So, we're moving along, and things are looking good.  The sink is cleaned out, the new installation is working great. 

And then we put in the hot and cold valves.  Teddy's noticing things are a pretty tight fit underneath for all the materials.  Then we try to quick fit the new faucet and valves, and guess what.  It's all about a millimeter too close to each other, and won't fit.  ARGH!!!  So, Teddy yet again is loosening everything he just installed to push it all apart just enough to gain that millimeter of space so that we can fit the pretty fixtures on top.  Well all his maneuvering worked, and we got everything to fit.   

And we did yet another victory dance (There is something really wrong with us)

OK, so what else could have gone wrong?  See in this picture on the back of the faucet the thing you pull to close the drain.  Well, it was the final part to install before putting the drain back together and turning on the water.  I went to put it in, and guess what, the medicine cabinet did not provide enough clearance to be able to fit the post in the faucet.  Seriously?!?!  What the heck were we going to do?  We couldn't take the faucet off to put it in because the hole it had to go in was also the housing for the allen wrench to tighten it down.  We could take down the cabinet, but Teddy was not having that option.  So, what did we do?  We obviously got it in as you can see above.  Well, we bent the heck out of it until it was at the right curvature that it cleared the cabinet and had a straight shot to the hole in the faucet and then Teddy straightened it back out.  He says that he wished we got a picture of my face when we first tried to put it in.  I wanted to stab my eye out with it. 

We were smart enough this time (finally) to NOT do a victory dance, and just held our breath as we finished reconnecting everything and then turned on the water.


Success!!!  The water worked just fine, and no leaks, although we are keeping a close eye on it the next few days just to be sure. 

Now that that was over, after 4 hours, lots of swearing, and promises that the faucet will remain as is forever, we moved on to finish the rest of the final touches.  Towel bars were hung, a hook was hung, we cleaned everything up, put all the tools away, and put back all our accessories.  So, we can finally show the reveal of the final product. 

But first a before shot

Plain cream walls, gold and chrome fixtures are now looking like this

I think the blue really makes the tile pop.  It's amazing what a coat of paint will do.  And while the towel bars are similar, replacing them with just chrome vs. gold and chrome I think updates the look.

Remember our old doors, original to when the house was built.

Now they are solid oak, six panel doors stained to match the trim of the recently installed windows. 

I didn't take a before from this angle, but it gives you a sense of the proximity of the medicine cabinet to the faucet for our final bit of remodel drama.

We are officially done, and did finally have our victory dance. 

While there were a few hiccups along the way with getting this project done.  Teddy and I did have a great time working on it.  We're so excited that another project has been crossed off our list, and we still have a couple of days to relax before heading back to work. 

Saturday, January 1, 2011

The Guest Bathroom Remodel: Day 3

We are on to Day 3 of our little project, and the theme of today is doors, doors and more doors.  We did start off the morning doing our second coat of blue paint on the walls. 

Here Teddy is working the roller.  I must say that the camera does not do the color justice.  I think the flash is washing it out some.  I'll have to play with the camera settings for the reveal picture when we're all done.

After finishing painting it was time to hang the doors.  We got some help from the hardware store as we bought prefinished, prehung doors.  So, it was a lot simpler than it could have been.  But we still had to get it fit in the space, where there are tile cut outs, make sure it is square and level.  So, it was time to start the shimming party.  So, Teddy shimmed

And he shimmed

And he shimmed some more, and finally the door was in.  It was time to move on to door number 2.

Door number two is ready for some shimming

At this point it was about 6pm, and we hadn't even started door 2, or any of the trim work.  So, I just realized, there would be a day number 4....but I pulled it together to get ready to help shim away.

See, I got my second wind.  (Also as a side note, yes I am wearing the same clothes as yesterday.  And before you say gross, they are my painting clothes.  That's my story, and I'm sticking to it!)

So, we finished the shimming of door 2, which went a lot faster than door 1.  And then Teddy worked on setting all the nails

I then got to work wood puttying all the nail holes.   The doors are in!  They are level, they open and close, and most of all they look great.

The next item on the agenda were the trim casings for the doors.  We again got some help from the hardware store, by buying precut, prefinished casings.  But of course there were a few hiccups here.  The only casing that fit right out of the box was the hallway side of the main bathroom door.  The other side needed a half inch ripped off due to the door being extra close to the wall as well as some trimming off the bottom because the tile made the trim too tall for the space.  On the closet doors, they didn't sell precut casings for an 18" door, so we bought a 24" one knowing we'd have to cut down the top to fit. 
So Teddy did all the measurements and marked all the boards and we climbed into the car to head to Home Depot.  They have a cutting station there, right?  We even called ahead to confirm.  Well, when we got there the guy at the Depot told us that the cuts we need to make are too small for their machine, and that they can't do 45 degree angles.  So, it's 8pm at night, and we're in the middle of Home Depot without the right tools to make the cuts we needed to finish the project.  Crap.  We decided to buy a miter saw, since we'll need it for projects in the future, and we do have a table saw that could do the rip, we just needed to get it all set up.  So, we were about to call it a night with a plan for tomorrow when Teddy's Uncle Toby called him back and said that he could come over to use all his saws in his wood shop.  Sweet!  It was already set up and ready for cutting.  So, Teddy headed over there and in no time was back home with all the cuts we needed made and ready to go up.  Back on track!

Here's the one side of the door that needed no cuts all up and ready

Teddy is putting up his freshly cut trim, and he measured everything perfectly.  It all fit like a glove.  So, he got the first set of nails in all the trim, we put in the door handles, and set off to bed knowing that Day 4 should be easy peasy.

Day 4 will be the finale, finishing out the trim, changing out the faucet, toilet seat, and hanging new towel bars.  I can't wait until this is all done and pulled together.  It's really looking great!

Friday, December 31, 2010

The Guest Bathroom Remodel: Day 2

Day 2 of our remodel project started with demolition.  Who doesn't love to do a little demo?  We had to take off the trim and doors for the bathroom and the closet.  Teddy let me whack away at it first.  I'm not sure why he trusted me with the crowbar and hammer, but away I went.

Here's my first few swings with the hammer working to tear off that trim

And success, I've worked my way around the door and am pulling that trim right out of the wall

After I got all the trim off, Teddy worked on pulling out the door frames

Teddy had a few nails left in the walls, but I was amazed at how quickly those doors came down, and what a difference it made in the room to remove those old dark doors.  Remember what it used to look like?


Then Teddy got to work on some of the caulk repair in the tub, while I started painting the ceiling


Here I am trying out our handy dandy edging tool we just bought.  It's called the Shur-Line paint edger, and that thing is amazing!  No need to tape except for in a few tight spots.  It was so much quicker to get that done.  I'd highly recommend it.

While waiting for the ceiling to dry, Teddy just couldn't take the waiting any more and we decided to quick fit one of the doors to see what it would look like.  (...and see if it fit...)  Even just standing in there, it looks so amazing!  I can't wait until it is all finished.  Even Fozzie came by to check it out.

After a few hours the ceiling was dry enough for a second coat and then we got to work on the walls.  We went with the color Glass of Milk for the ceiling and Etched Glass for the walls.  It's a nice soft blue that really makes the white tiles pop vs. blending in like before.  Teddy's having some fun here painting away.

Finally the first coat of blue is done.  We decided to get one more thing done before calling it a day.

Installing our new and improved light fixture!!  It's more than twice as bright, and a lot more attractive than the old version.  Remember what that looked like?

It's quite the improvement, if I do say so my self. 

So, day 2 is done, and we are starting to see what the end product will look like. 

Tomorrow is Day 3, and will be all about the doors, and keeping our fingers crossed that it will be the last day.  But now that I've jinxed us, I'm sure there will be a day 4.  :)